Updated: 17 December 2017

Applying for your New Zealand VISITOR VISA is easier and faster when done online. The New Zealand immigration has made it smooth and simple for anybody who has access to a computer and the internet.
Here’s my way of helping you out through my experience this year.
DISCLAIMER
This is not the official website of The NZ Immigration. Requirements change all the time. Please refer to their website for updated information.
NZ Immigration website: https://www.immigration.govt.nz/new-zealand-visas/apply-for-a-visa

ONLINE APPLICATION
If you are a genuine tourist who have enough funds to support your own travel, the online application is fairly easy. Here are the requirements you need to prepare:
I. IDENTITY
Must scan and upload:
- Photo ID – make sure it meets the NZ visa photo standard (https://www.immigration.govt.nz/new-zealand-visas/apply-for-a-visa/tools-and-information/acceptable-photos)
- Passport – back and front
Only after the online application will you need to send your original passport for verification. You will receive an email if this is needed.
II. HEALTH
- Not needed if visiting for less than 6 months
- If visiting for more than 6 months – upload a chest x-ray and/or a medical examination result
III. CHARACTER
- Not needed if visiting for less than 24 months
- If age 17 and staying for more than 24 months – upload police certificates from your country of citizenship and any country you spent more than 5 years in since turning 17
IV. BONAFIDE
Provide proof that you are a genuine tourist and will return home after your visa expires. NZ immigration gives you the freedom to include extra information that supports your reason for visit. Here are my suggestions:
Must submit:
- Itinerary (plans in NZ) – free format, can include date, tours and events
- Accommodation
– If staying in a hotel/hostel, provide a pre-paid booking confirmation
– If staying with family or friends, include their address in your itinerary, or provide a letter from them stating you will be staying with them for the duration of your visit (a tenancy contract can also be added if available), or any other proof that will convince immigration that you won’t be sleeping in the streets - Travel history (records of previous travel) – free format, can include list of countries visited, photos, visas, passport stamps
Other documents that you can include:
- Proof of any personal, financial, work or other commitment in your home country
- Proof of employment
- Letter of leave from employer
- Proof of relationship with contacts/family/friends.
For visitor visa extension:
- A letter why you want to extend your visit and proof/photos of places in NZ that you already visited
Samples of what I included in my application (click to enlarge):


V. FUNDS or SPONSORSHIP
Must submit:
- Bank statement – make sure it shows the bank name and your name
– At least NZ $1,000 per month of intended stay, or
– NZ $400 per month if you’ve already paid for your accommodation
Other documents that you can include:
- credit card statements, bank drafts, travellers’ cheques
- Proof of employment or pay slips
If you are sponsored, please check the website for the eligibility, requirement and “Sponsorship Form for Temporary Entry”.
VI. HEALTH CARE
You must agree to pay your own health care costs or any medical assistance received in NZ. This is just a tick box on the online application.
VII. ONWARD TRAVEL
Must submit:
- Bank statement that you have enough money to buy a ticket out of NZ, in addition to the funds you have to live on.
- Dummy return ticket – I don’t think this is really necessary as immigration knows that dummy tickets are cancellable. This is just my opinion.
Note:
- Don’t buy your ticket until visa is granted. Return ticket is only needed when checking in or when passing through immigration.
- If you are not a citizen of the country you will return to after your visit, you must provide your visa to enter that country.
OTHER DOCUMENTS
Before the end of the online application, you will have the option to upload other documents. These are not required, but if you have them on hand, they can help strengthen your application.
Choose only those that apply to the visitor visa (click to enlarge):

OTHER INFORMATION
Here are other information you’ll need to answer as you go through the online application:
- Health and Character Details – answerable by YES or NO (click to enlarge)
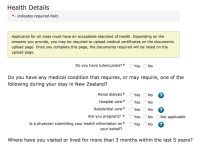
Health Details 
Character Details - Work history / Self-employment
- Company name
- Employer’s Address
- Mobile Number
- Start date and end date
3. Partners details – whether or not travelling with you
- Name and other names your partner is known by
- Gender
- Date of birth
- Partner’s state/province/region of birth
- Partner’s town/city of birth
- Partner’s passport number
- Partner’s passport expiry date
- Other citizenships your partner holds
4. Contacts in New Zealand – answerable by Yes or No. If Yes, provide the following info:
- Name
- Date of birth
- Address
- Mobile Number
TIPS ON ANSWERING QUESTIONS
- Read the questions properly and answer truthfully.
- Size of each uploaded document must not exceed 10 MB.
- You can save your application and retrieve it on a later time.
FEES & PAYMENT
Here are the online application fees from the NZ Immigration website (as of December 2017):
- For Filipino citizens applying from the Philippines – free application cost for visas less than 60 days.
- For applications and extensions done in NZ – $165 must be paid

These are the fees you will need to pay if applying from the Philippines (as of December 2017):

Know more: http://www.vfsglobal.com/newzealand/philippines/visa-fees-at-glance.html
AFTER ONLINE SUBMISSION
After applying online, wait for an email that will give you further instructions. They may ask you more questions, call you for a quick interview or ask you to send your passport for verification.
For me, I paid the application fee through bank transfer and emailed them the receipt. Then when asked for my passport, I sent it through JRS with complete information as they requested.

VISA APPROVAL
In 20 days or less, you will receive results of your visa application. Mine took only 8 days.

Now you’re ready to fly!

Great reead thank you
LikeLike
hi! this is very neat and informative. Hopefully you can still see this po. Just wanna ask if you submitted hotel booking during your application po? Thank you.
LikeLike
Hi there, no i did not have to submit because I declared I have contacts and family in NZ. I think by this year some of the requirements changed already. They are very clear in their website what supplementary documents they would need 🙂
LikeLike
Hi! Ilang days nyo po nareceive yung approval letter after nyo makuha yung yellow paper?
LikeLike
I received the approval email and online VISA after 10 days. Not sure what you meant about the yellow paper 🙂
LikeLike
Voting ate violet for filipino ambassador or immigration advisor. 😊 for real
LikeLiked by 1 person
Muse nalang ako please. Haha.
LikeLike